

Chris is a gardening writer and nature enthusiast. He graduated from Oxford Brookes University in 2022 with an MA in Psychology. Chris works with the Leeds Green Action Society, helping their food cooperative by growing various fruit and vegetables on their two allotments in Hyde Park, Leeds.
Reviewed By ROY NICOL

Roy is a Professional Gardener and Horticultural Consultant, specialising in large garden year-round maintenance and garden development. He is an RHS Master of Horticulture and uses his research in the application of no-dig methods in ornamental garden settings. Roy has been a Professional Gardener for more than six years and is a member of the Chartered Institute of Horticulture, Professional Gardener's Guild and Association of Professional Landscapers (Professional Gardener).
Contributions From SALLY FLATMAN

Sally Flatman is the host and creator of the 'Our Plant Stories' podcast. She is a former BBC Radio producer and has received an RHS Level 2 Certificate in the Principles of Horticulture from Capel Manor College.
IN THIS GUIDE
- What Are Plant Cuttings?
- What Are They Used For?
- How To Grow Plant Cuttings
- 1) Take Your Cutting
- 2) Remove Any Excess Foliage
- 3) Situate Your Cuttings
- Using An Aeroponic Propagator
- Planting In Compost
- Growing In Standing Water
- How Long Do Cuttings Take To Root?
- Which Plants Can You Take Cuttings From?
- When Should You Take Cuttings?
- There You Have It…
- References
Cuttings are a simple way to get new plants without seeds.
It’s hard not to be impressed by the natural elegance of the cutting process: just snip off part of your plant, take proper care of it, and soon you’ll have an entirely new one.
This new plant is a clone of its mother plant, which is truly remarkable.
“Learning how to take cuttings is a useful skill that will help you multiply your plants and swap them with other gardeners,” shares Sally Flatman from Our Plant Stories.
“It can be expensive if you’re constantly trying to grow plants and buy them all, so this is a great way of saving you some pennies.”
We’ve written this guide to equip you with the knowledge you need to successfully take and grow cuttings.
What Are Plant Cuttings?

A cutting is a section of a plant deliberately removed for the purpose of propagation.
Done right, you can grow a whole new plant without any seed.
The word “cutting” refers to the removed section of the plant, as well as the act of removing it.
When taking a cutting, there are a few things to bear in mind to make sure it will grow.
But before we get into that, a bit about why people take cuttings.
What Are They Used For?

You can use cuttings to get more plants, either from one you own, from somebody else’s plant, or from something growing in the wild.
Taking a cutting from your own plants is useful if you’re moving house and can’t take your garden with you, or if you just want to have more.
Taking cuttings from someone else’s plant is a great way to share and enhance each other’s collection.
Taking a cutting from the wild allows you to bring nature into your home without uprooting or harming any plants.
“When taking cuttings from plants in the wild, care should be taken to ensure the plant is not in a protected area (such as a Site of Special Scientific Interest), the plant does not itself have special protection under Schedule 8 of the Wildlife and Countryside Act 1981 (such as the English Bluebell) or the plant is not an invasive non-native species (such as Himalayan Balsam) under the Wildlife and Countryside Act 1981, otherwise a criminal offence could be committed,” explains Roy Nicol, a Master Horticulturist.1What are the laws that protect wild plants? (n.d.). Lancashire Constabulary. Retrieved July 3, 2023, from https://www.lancashire.police.uk/faqs/wildlife-crime/what-are-the-laws-that-protect-wild-plants/
“It should be borne in mind the owner’s permission is required to take cuttings from someone else’s garden, a public park or garden.”
The beauty of cuttings is being able to borrow plants from nature, friends’ houses, and even plant nurseries (with permission), all without damaging the mother plant.
How To Grow Plant Cuttings

I’ve recently grown a Syngonium Wendlandii (Goose Foot) houseplant from an unrooted cutting bought online.
To help illustrate the process of growing this plant from a cutting, the steps and imagery below showcase how this was taken from a simple cutting into a thriving, healthy houseplant.
1) Take Your Cutting
Cuttings are available online from suppliers and are commonly much cheaper than purchasing a fully grown plant.
If you’re looking at taking your own cuttings, make sure you have a pair of very sharp, freshly sterilised secateurs or a horticultural knife.

This is very important as it helps to prevent the introduction of root rot, which can ultimately damage or even kill plants grown via cuttings.
“There are several types of cuttings, including softwood where the stem is new green growth, semi-ripe and ripe cuttings where the stem has started to become firm before it becomes woody, and hardwood where the stem is woody,” adds Roy.
“Along this progression, stems have decreasing amounts of hormones to assist new roots being formed, so take longer to root but require less close care such as keeping a moist environment.”
You’ll want to cut the plant just below the node: the part where the leaf joins the stem.

Cut just under the node, very close to the stem, so that the node remains on the cutting.
The node contains the highest concentration of rooting hormones that will give the cutting the best chance of taking root.
For softwood, aim to take a cutting of about ten centimetres: enough that you can plant it in the soil with the leaves still a good distance above.

2) Remove Any Excess Foliage
On this occasion my Syngonium cutting had only one leaf, but for other cuttings, to maximise the chances of rooting, you should look to remove all leaves except for the top few.
You want some foliage so that the plant can photosynthesise, but not too many that this process competes with the plant’s resources to make new roots.
Here’s an example with some photographs of a buddleja cutting I took to illustrate this:


3) Situate Your Cuttings
If you’re not planting straight away, transport your cutting in a sealed plastic bag with a couple of drops of water.
This will keep the moisture in and prevent the cutting from drying out.
Put a label on the bag so you know what you’ve got, as identifying plants just from the leaves can be difficult.
There are three typical options for growing cuttings, with each of these covered below:
Using An Aeroponic Propagator
For my Goose Foot plant, I decided to put my aeroponic propagator through its paces.

This is essentially a sealed propagator which provides the ideal conditions for new cuttings to thrive:
- Water sprayer which ensures roots are constantly given enough water, without them being left in standing water (a common cause of root rot)
- Grow lights to support plant growth
- Water heater to ensure an optimum water temperature of 20-22°C
- Sealed lid to maintain humid conditions
The cuttings are placed in small foam plugs which help to keep them in place.


The 24/7 spraying of water ensures that the roots receive a constant supply of water nutrients and oxygen.
Some choose to add additional nutrients to the water, but I’ve always had extremely positive results using water alone.
Once the cutting was placed in the aeroponic propagator on day 1, it was simply a case of letting it sit for a few weeks to allow the rooting process to take place.

The hardest part was resisting the temptation to remove it and take a look!
On day 14 I removed the foam plug from the propagator and was pleasantly rewarded with the very early beginnings of new root growth.
Notice the slight white bump where a new root is forming:

You can see from these pictures that the plant also spent some energy putting out a new leaf which, while not ideal (we want the plant to focus all its energy on rooting in the early days) was still a sign of healthy growth.

At roughly day 28, I was highly satisfied with the size of the roots, which had grown to around a few inches in length and were close to reaching the pool of water below plug tray.


I removed the cutting from the propagator and used a sharp cutting knife to remove any brown matter, which should help to prevent root rot taking hold.

I then potted it up in a mix of bark, worm castings, perlite, coco coir, charcoal and sphagnum moss.

To help the transition from the propagator, I kept the plant in a warm location, watered it regularly and misted it to replicate humid conditions.
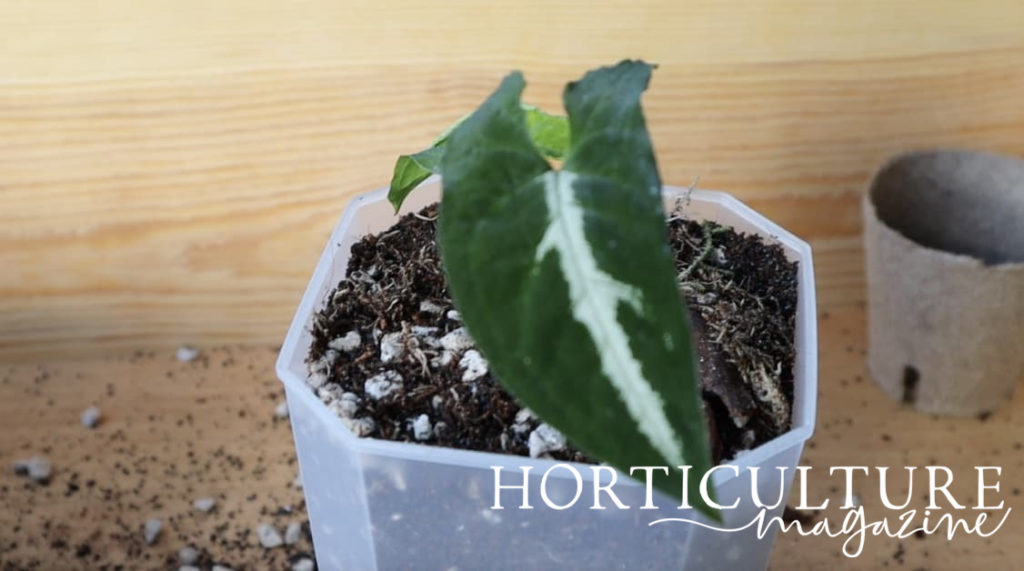
From here, the plant can be treated like any other, being kept in a bright location with regular watering.
Planting In Compost
Another option for those that don’t have access to an aeroponic propagator is simply to plant your cuttings in compost.
When it comes to potting, seed and cutting compost is the best option for cuttings as it has the consistency and nutrient balance to encourage new root growth.
Cuttings should be planted into moist compost so they have water available straight away.

Once planted, be vigilant and ensure the compost stays moist – the growth process is strenuous, so it’s important that cuttings have everything they need.
Use a dibber to make a hole in the soil (this can be a pencil, pen, or anything long and thin), then poke the cuttings gently into the holes.

Use your fingers to gently push the compost back against the plant.
Before planting the cutting, you can dip the root in hormone rooting medium (water or powder) to boost its chances of growing.

Then cover the pot with plastic film to seal in the moisture, tight enough that condensation forms inside but not too tight that air can’t get in.
“I find clear freezer bags work well for this stage, with a small stick in the centre of the pot to keep the bag from collapsing onto the cutting,” says Roy.
“It’s best to keep the cuttings out of direct sunlight while waiting for them to form roots as they can overheat.”
You may want to label the pot to help you remember what’s growing inside.
Growing In Standing Water
The third (and probably the simplest) option is simply to place your cuttings in standing water.
A test tube propagator is ideal for this purpose, and can be easily filled and placed on a windowsill.
This is a process I recently undertook with a mint cutting and it was very successful, as you can see in the images below:

The water should be replaced at least every few days to prevent any root rot caused by the roots sitting in standing water.
After a while, the plant will begin to take root. Timings are covered in the next section.
When the cutting is rooted it’s time to plant it out.
Harden it for a couple of weeks (grow it somewhere with a breeze and sunlight to simulate outdoor growing conditions), then plant cuttings individually in pots.
From this stage, they can be treated as regular plants.
How Long Do Cuttings Take To Root?

This will depend on the type of plant and rooting method used, as well as the type of cutting, as softwood cuttings root the soonest and ripe cuttings later.
Some begin to root within a week of being cut from the mother plant, while others – succulents, for example – can take much longer.
You should expect the process to take anywhere from two to ten weeks.
In my experience, an aeroponic propagator can significantly speed up the process!
If growing in compost it can be tempting to try and get a look at how well your cutting is rooting, but resist this temptation!
You’ll be able to tell by seeing whether the cutting is still alive and well after a couple of weeks of being planted.
“The easiest way to see that a cutting has rooted is when it produces new growth,” explains Roy.
“This shows the plant is taking up water from the roots, photosynthesising and using the energy this produces to grow.”
If so, it’s probably taking root well. If not, keep an eye on it, and remove it if it begins to dry out.
Which Plants Can You Take Cuttings From?

Plants that are showing new growth will be best for cuttings, as they’ll have the highest concentration of growth-stimulating hormones.
If you have an old plant, you can prune it back to stimulate new growth, then take a cutting from this section.
Healthy plants should be chosen for cuttings, ones showing good growth and no pests.
Shoots that aren’t flowering will take root more easily.
Herbs are very easy to grow from cuttings – and this is a great place to start if you’re a beginner trying to get a feel for the process.

Mint, coriander, rosemary, sage, and all sorts of other herbs can be grown without any soil at all.
Just place a cutting in a jar of water so that the leaves are a couple of inches above the surface, place in a well-lit area, and watch the roots begin to appear.
Top up the water when it begins to get low, and you’re good to go.
Here are some other plants that lend themselves well to cutting:
- Softwood cuttings, from perennials like petunia, geranium, pelargonium, biden, and more.
- Deciduous shrubs like hydrangeas, buddleja, lavender, and fuchsia.
- Succulents, although expect these to take a bit longer to go to root.
- Berry bushes: these are semi-ripe cuttings rather than softwood.
When Should You Take Cuttings?
It’s best to take a cutting in the morning, as this is when the plant material will be full of water.
The best time of year to take a softwood cutting is in spring or early summer, as this is when plants are in the most suitable stage of their growth cycle.
Semi-ripe and ripe cuttings are taken from late spring to mid-summer.
There You Have It…
Cuttings are a simple and elegant way of getting new plants.
Providing you take care throughout the process, a cutting can grow into a strong and healthy plant surprisingly quickly.
This guide has introduced cuttings and given basic instructions on how to propagate a plant cutting into a new plant.

With cuttings, practice makes perfect. Try not to be disheartened if your first cuttings don’t take properly: you’ll get there!
Happy gardening.