

Chris is a gardening writer and nature enthusiast. He graduated from Oxford Brookes University in 2022 with an MA in Psychology. Chris works with the Leeds Green Action Society, helping their food cooperative by growing various fruit and vegetables on their two allotments in Hyde Park, Leeds.
Reviewed By COLIN SKELLY

Colin is a Horticulturist and Horticultural Consultant with experience in a range of practical and managerial roles across heritage, commercial and public horticulture. He holds the Royal Horticultural Society’s Master of Horticulture award and has a particular interest in horticultural ecology and naturalistic planting for habitat and climate resilience.
IN THIS GUIDE
- Why Level Out Your Garden?
- What You’ll Need To Level A Slope
- How To Level A Sloping Garden
- 1) Make Sure You Have Permission
- 2) Measure The Rise And Run Of The Slope
- 3) Water The Ground You’ll Be Digging
- 4) Build The Retaining Wall
- 5) Pile Up Soil Behind The Retaining Wall
- 6) Ensure The New Lawn Is Level
- 7) Compact The Soil
- 8) Plant A New Lawn
- 9) Compact The Turf
- 10) Take A Moment To Appreciate Your Handy Work!
- What Materials Are Used For A Retaining Wall?
- Levelling A Sloping Garden: DIY Or Hire In Help?
- How Long Will It Take To Level A Slope?
- Top Tips For Levelling A Sloping Garden
- There You Have It…
- References
An uneven lawn with lumps and bumps isn’t ideal for your garden, but you can usually work around it.
Slopes, on the other hand, can interfere with all sorts of garden-based activities.
This guide will cover everything you need to know about levelling a sloping garden including – most importantly – whether you should take on the job yourself, or hire professional landscapers to do it for you.
Here’s what we’ll cover:
- Reasons to level out your garden.
- What you’ll need to level a sloping garden.
- How to actually do the levelling.
- Options for retaining wall materials.
- How to decide whether to do the job yourself or hire in help.
- How long the job might take.
Let’s get started.
Why Level Out Your Garden?
Unfortunately, it’s hard to do much with a slope, especially when it’s very steep.
While there are some plants that thrive in a sloping garden – chairs won’t rest level, it will be uncomfortable to sit or lay on the grass, and the incline will interfere with games.
A slope doesn’t mean the space is permanently out of action though.
There are a few ways to level out a garden, and this guide will run you through them.
The main reason people look to level a sloping garden is to give themselves a larger workable space.
But because a slope can also lead to problems with flooding and soil erosion, levelling it out is useful for more than just making your garden easier to relax in.
Here are some of the other benefits to levelling out a sloping garden:
- It helps with drainage, and can direct runoff water away from your property.
- A flat lawn is easier to mow.
- A level lawn means that more water can absorb into the soil.
- There is more space to relax on or for kids to play on.

What You’ll Need To Level A Slope
This is a big job, but the list of tools you’ll need isn’t very long.
- A couple of stakes and some string for measuring the rise and run of your current garden.
- A spirit level to check things are flat.
- Water to moisten your soil.
- A shovel to dig with.
- The materials for your retaining wall (covered in a later section).
- A soil compactor to squash everything down.
- Grass seed or turf, for your nice new lawn.
How To Level A Sloping Garden
The process and the guiding logic are the same whether the slope faces away from your house or toward it.
Remember though, that if the slope faces toward your house, you’ll want to leave a walkway between the retaining wall and your house. This allows for access and drainage.1Retaining walls. (2021, November 4). Designing Buildings. Retrieved March 20, 2023, from https://www.designingbuildings.co.uk/wiki/Retaining_walls
Remember that this is a lot of work in practice, even if it may not look like much on paper.
To level a sloping grade, see this video for a time-lapse demonstration of the entire process:
Or follow each step in the guide below:
1) Make Sure You Have Permission
This is an important first step that’s easily missed.
Check with utility companies and your local council to make sure there are no cables under your garden that will be disrupted, and whether the work you are planning requires planning permission.2Plans showing where electricity cables are. (n.d.). UK Power Networks. Retrieved March 20, 2023, from https://www.ukpowernetworks.co.uk/safety/around-power-lines/request-plans-showing-where-electricity-cables-are
If it does require planning permission, make sure you have acquired this before starting work!
2) Measure The Rise And Run Of The Slope
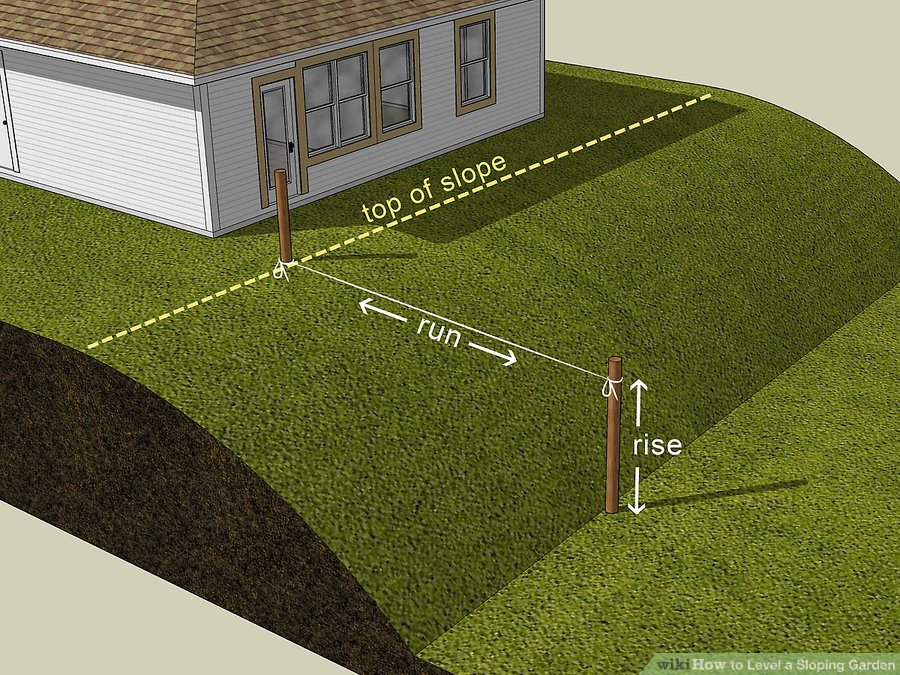
This step will let you determine how tall the retaining wall will need to be.
Two stakes are placed, one each at the top and bottom of the slope, and a string tied between them.
The string is called the ‘run’, and its height on the second stake is referred to as the ‘rise’.
On the top stake the string should be at ground level, and it should stretch to meet the other stake.
At this point, place a spirit level on the line to check that it is level.
It’s important to get this right, as your new lawn will follow the line of the run.
With this step, you determine the height needed for your retaining wall, as well as the amount of soil you’ll need to fill the gap behind it.
If you think back to high school maths, the rise and run measurements give you two sides of a triangle whose area you can calculate.
Multiplying the area of this triangle by the length of your retaining wall will give you the approximate volume of the space needing to be filled behind the retaining wall.
3) Water The Ground You’ll Be Digging

Aim to do this at least 24 hours before you start digging, as it will make the ground easier to work with.
Be careful not to water too much though: wet soil can be just as tricky to work with as dry.
4) Build The Retaining Wall

A retaining wall is designed to support the newly raised land in your garden, and to prevent your nice new flat lawn from collapsing after rainfall.
The retaining wall holds back the pressure of the soil and, when it rains, the water that soaks into it.
It’s vitally important that the materials used for the wall are strong enough to reduce the risk of it collapsing, but we’ll cover this in the next section.
You should aim for a retaining wall no more than two feet tall.
Beyond this point they are exposed to high amounts of pressure that make collapse more likely.
If the rise of your sloped garden is above two feet, consider building a series of terraces instead.
This guide is tailored toward levelling a sloping garden, but the process for installing a series of terraces is similar.
5) Pile Up Soil Behind The Retaining Wall

Once the retaining wall is erected and stable, pile in soil behind it.
This soil will make up your new, level garden – so it’s important to do this step carefully until level ground is achieved.
If you are just raising a lawn you can order in topsoil to fill the gap behind your retaining wall.
If you are lowering part of the lawn, you can use the soil taken from here to fill the gap behind the retaining wall.
6) Ensure The New Lawn Is Level

Before you begin compacting the soil, it’s important to check that it is level, and that it is at the correct level.
It may be the case that you need to add or even remove some soil before the next step.
Gauging the level by eye is a good start, but the spirit level you used earlier will be your friend here: lay it out on the lawn in a few places to check everything is flat and even.
You can also use the stakes and string method again: put a stake at each corner of your lawn and run the string between them at an even height on each stake.
If your lawn is level, the string will be level too.
At this stage you can add a layer of compost at a uniform thickness on top of your soil, if you want to ensure it will have enough nutrients.
7) Compact The Soil

Now the soil is level, compacting it will help to remove any air and cavities.
This step reduces the likelihood of bumps and lumps appearing in your newly levelled garden after the next rainfall.
It also protects the structural integrity of the retaining wall by exposing it to more consistent pressures.
Running a soil compactor back and forth over the soil a few times should do the trick.
8) Plant A New Lawn

Now it’s time to plant or place grass on top of the exposed soil.
If you’re growing from seed, scatter the seeds over the soil as per the directions on the seed packet.
If you’re using turf, lay the sheets out flat and as close to each other as possible.
Once they’ve taken root it will be almost impossible to see the lines or gaps between the different pieces.
9) Compact The Turf

Get the soil compactor back out (or a lawn roller) and run it over the turf, if that’s the route you went for.
This will help the roots to take more quickly, and will ensure that the grass is good to be walked on.
10) Take A Moment To Appreciate Your Handy Work!

If you’ve got this far, congratulations. That’s a tough job and you deserve a pat on the back and a sit down.
What Materials Are Used For A Retaining Wall?
You have a few options, each of which brings its own aesthetic and functional considerations:
- Concrete retaining blocks: these aren’t the cheapest option, but they are purpose-built for the job. Many blocks are hollow in the centre, and this space is filled with soil. A plant can be grown to spill over the side of the block, eventually hiding them behind some foliage.
- Breeze blocks: these are cheaper than purpose-built retaining blocks, but they aren’t hollow, so the surface will always be exposed.
- House bricks are a popular choice that combine material strength with a nice aesthetic. If you use the same bricks as your house, you can achieve a nice design consistency.
- Natural stone: the most expensive, but also very aesthetically pleasing.
- Reclaimed railway sleepers: the only wood that will be strong enough to make a serviceable retaining wall.
- Gabions: these are the wire nets full of stone that you sometimes see buffering steep walls beside motorways (see below).

Dry stone or masonry are generally recommended over wood because of their durability.
Levelling A Sloping Garden: DIY Or Hire In Help?
While it is definitely possible to level a sloping garden without professional help, please bear in mind that this is a big job!
Make sure you know what you’re signing up for before the shovel breaks ground.
The most important thing is getting the retaining wall right.
If this stands up and holds back the soil behind it, happy days. If not, you’re looking at potentially timely and expensive repairs.
If you do the job yourself and manage to get a retaining wall built, you need to make sure it is strong enough.
We’ve read horror stories of people building walls that collapse after the first rainfall, and being forced to hire professional help to fix the mess.
If you don’t feel confident with the scale of the job, it may be best to speak with contractors about your options.
“Wet soil and gradients result in large amounts of force acting against the retaining wall,” shares Master Horticulturist Colin Skelly.
“If you are considering anything other than a small project, I would consult a contractor to ensure that the project doesn’t result in more work down the line or even structural damage to houses or garden buildings.”
The initial cost could save time, hassle, and even money in the long run.
How Long Will It Take To Level A Slope?
There’s no easy answer to this, unfortunately. The time it takes will depend on a few factors:
- The size of your garden.
- How many people are helping.
- How steep the slope is.
Don’t expect this to be a quick job though, as we’ve said previously.
Forum posts discussing levelling sloping gardens put an estimate of at least a fortnight for most garden sizes.
Top Tips For Levelling A Sloping Garden
If you do the job yourself, try to use soil you dig up to level elsewhere.
Skips are very expensive to rent, and removing soil this way can quickly ramp up the price of the job.
Labour is the main place where you have the opportunity to save money, but remember what we’ve said previously about the scale of this job.
Aim to level your lawn in early spring if possible, to give your new grass the best chance to grow strong over summer.
As a general rule, retaining walls are best at no more than two feet high.
Beyond this height the structure risks becoming unstable, as an incredible amount of pressure is put onto the wall by the soil behind.
Make sure you add ‘weep holes’ to the bottom of stone or concrete walls so that water can drain from the soil behind.
It’s absolutely vital that you factor in the weight of water when designing your wall, otherwise it may collapse under the extra pressure caused by rainfall.
There You Have It…
Hopefully this guide has given you the information you need to decide whether to level your garden yourself, or whether to hire in help.
And if you’ve opted for the former, you know what you’re up against!
A levelled garden really will be worthwhile in most cases.
The extra space it opens up can be used for so many things, and the clean, crisp lines help to achieve a nicer garden design.